![]()
Screenshots, pictures of a computer screen, are often used to illustrate software reviews and workflow tutorials. They’re particularly useful to the Ask Different community. It’s sometimes difficult to explain multiple settings in a preference pane or application dialog box. Many questions and answers can be improved by including images. Best of all, it’s free and easy. Mac OS X includes all of the tools you need to take great screenshots and the process is painless once you develop an efficient workflow.
The specifics of this tutorial are geared towards Mac OS X 10.7 Lion. The basic steps for taking a screenshot are the same for previous versions of Mac OS X going back as far as I can recall, but some details and the capabilities of Preview will vary according the version of the OS you’re using.
Desktop Shutterbug
Taking a picture of the entire desktop is simple. Press ⌘(command) + shift + 3 simultaneously on the keyboard and you’ll hear a shutter click (assuming your Macintosh audio isn’t muted). In a moment, an image file will appear on the desktop. If you want to copy the captured image directly into the clipboard without creating a file—to paste directly into another application—use ⌃(control) + ⌘(command) + shift + 3.
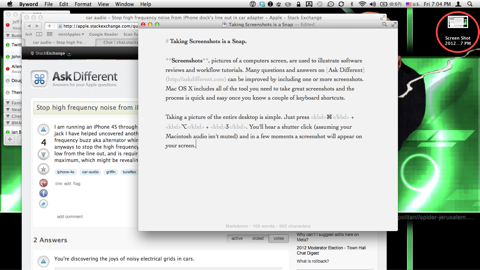
This is a screenshot of my desktop. That’s a screenshot file in the upper right corner.
I like to rename that file immediately so that I know what it is. To do this quickly, select the file using a single mouse click, then hit return. The filename will become an editable text field. Type the new file name and hit return again when you’re done.

Sometimes you don’t want to include the entire desktop . To grab the image detailing the editable filename, I used ⌘(command) + shift + 4. Instead of immediately taking a picture, this key combination brings up a crosshair pointer that displays the current x/y coordinate location of the pointer. Move the crosshair to one corner of the area of the screen you want to grab, then click and hold the mouse button down as you drag a rectangle around that area. As you’re dragging, the numbers in the pointer will change to let you know the width and height of the selected area in pixels. Hold the spacebar while keeping the mouse button depressed to drag the frame to a new location and better compose the image . When you’re happy with the composition, release the mouse button. You will hear the shutter sound and another file will appear on the desktop. If you change your mind before releasing the mouse button you can hit the esc(ape) key to cancel. You can use this same process to take pictures of menus.
You can use the same technique to grab a picture of an individual window, but there’s an even better way. Strike the ⌘(command) + shift + 4 chord again, but instead of clicking and dragging with the mouse, immediately hit spacebar. The mouse pointer becomes a camera icon and the window over which the pointer is hovering is highlighted. Move the mouse over the target window until it is selected, then click. The resulting picture will be of the entire window and a drop shadow that adds a little pop.
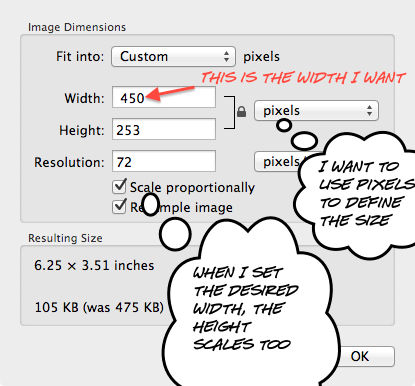
Grabbing the images is that simple, but sometimes they need minor adjustment. For example, the desktop image that appears above was originally 1366 x 768, the resolution of my MacBook Air display. That’s too large for web use so we need to make it smaller.
In a future tutorial we’ll create an easy shortcut to automate the image scaling process, but for the now we’ll do it manually.
Fixing it in post
Open the image in Preview, a utility that Apple provides with OS X. You can take screenshots from within Preview too, but using the key chords is generally more efficient.
From the menu select Tools > Adjust Size. A dialog box will appear. In most cases, I rescale the image by defining the desired width. Hit OK when you’re done.
If you’re using OS X 10.7 Lion, you can also use Preview to annotate the image with text, arrows, and bubbles as I’ve done above. I leave it up to you to figure this out, at least for now. If your version of Preview doesn’t allow this, you can use an alternative image editor.
That’s all there is to it. The next time you find yourself at a loss to describe what you’re seeing on your Macintosh screen, consider using a picture. After all, it’s worth a thousand words.
Learn more screen capture tricks at Ask Different. Start by searching for questions with the Screen-Capture tag. If you don’t find what you’re looking for, ask a new question.
This is fantastic! I’m going to bookmark this for new to mac users looking to create and document things on their mac.
While I love the built-in screen shot tools in OS X, I’ve found that it’s rarely the case I just want a snap of a window. I usually want to call something out too: point to something, circle something, etc. And for that, screen shots combined with Skitch have proved to be awesome. Skitch is free in the MAS and a super-powerful way to mark up your screen shots.
Also, you neglected to mention that simply pressing the spacebar (rather than holding it) while shift-command-4-ing lets you snap a window or menu.
But great article! Sorry I forgot to praise it in that comment. 😀
There is an entire paragraph devoted to that very process.
Great article! In addition to being able to use the space bar to move the selection when using ⌘⇧4, you can also use ⇧ to resize in a single direction and ⌥ to resize opposite sides at the same time as seen in this video:
http://www.macworld.com/article/164123/2011/12/mac_os_x_screenshot_secrets.html
(In the video he says that with ⌘⇧4 and ⌥ the rectangle retains its height to width ratio, but it’s more general than that – dragging up moves the top of the rectangle opposite with the down, and the left of the rectangle opposite the right)
Awesome article. I knew about the Command Shift 4 for screenshots, but never knew about the control key for copying to clipboard…much more convenient than Windows 7 Snipping Tool and now I won’t have to waste time deleting screenshots from my desktop. Thanks!
Taking screenshots on Mac by pressing some keyboard shortcuts works great, but it won’t work for capturing screen with mouse cursor and capturing the scrollable web page. In this case, you can discover solutions here: http://screenshot.net/screenshot-on-macbook.html